Laptop Keyboard Repair - Removing and replacing laptop Keyboard
Detailed guide for laptop keyboard repair and replacement do it yourself keyboard repair. It is not possible to explain all the laptop model but you can get ideal how to do laptop keyboard replacement. Use this guide for Lenovo, HP Hewlett Packard, Dell, Google Pixelbook, Apple, Asus, Acer, MSI, Samsung and Microsoft keyboard troubleshooting and repairs.
Note:-If your laptop is under warranty then I advice to contact local service center. Use this techniques when keyboard is not working properly.It is useful for keyboard troubleshooting. It provide guide to replace keyboard membrane.
Methods for laptop keyboard replacement and repair.
1) First unplug AC adapter and remove battery before opening and disassemble laptop case, proceed on your own risk.
I am explaining laptop keyboard repairing and replacement for Sony VAIO model number:- pcg-9s1L laptop and method will be similar to other Sony laptop also.
How to remove keyboard from laptop.
2) Keep all tool set for laptop and Insert Flathead screwdriver under the keyboard bezel.Lift it up with light pressure upwards and releasing plastic latches and with your hand’s finger removing the keyboard bezel. Laptop keyboard bezel has a press lock. You can easily remove keyboard bezel from laptop.
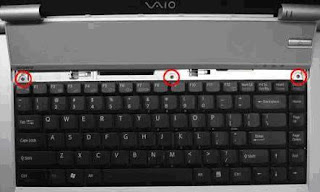
3) Don’t apply much force to remove keyboard bezel assembly. As in some laptop, keyboard bezel might be connected to the motherboard as it is shown in the picture. If something is attached with keyboard bezel, do not remove it as it is not necessary to disconnect the keyboard bezel to replace laptop keyboard. Purpose of removing bezel is to get access the keyboard screws. This is wise steps for laptop keyboard repair and replacement.
4) Remove three or sometime more screws from the top of the keyboard. Carefully lift up the keyboard from the laptop case. This result in successful removal of laptop keyboard.
How to replace keyboard ribbon cable.
5) The keyboard is connected with motherboard with a flat ribbon cable. You need to unlock laptop keyboard connector. You can unlock connector while pressing it toward the laptop LCD screen. Use step number 5 to replace keyboard flat ribbon cable. Check keyboard socket pin before keyboard cable replacement. Most of the keyboard socket has 30 to 32 pin. 30 pin keyboard socket can not be used with 32 pin cable and vice a versa.
This picture shows how to unlock laptop keyboard connector. Carefully move the connector lock 2-3 millimeters up and then pull the keyboard cable. To Attach the keyboard follow these all steps in last to first steps. This conclude how to repair and replace laptop keyboard component.


