How to take apart notebook of Lenovo, HP Hewlett Packard, Dell, Google Chromebook Pixel, Apple, Asus, Acer, MSI, Samsung and Microsoft.
In the previous post we learn first 8 steps of How to Disassemble Laptop. On this web page i conjoin 8 more steps for how to take apart notebook. You can learn how to replace notebook system board, how to replace notebook LCD and heatsink.These are cardinal steps for notebook repair and troubleshooting. You can open notebook and replace notebook all hardware.
STEP 9 How to replace notebook Display LCD.
This is prominent step to take apart notebook display assembly from motherboard.You can find one cable(most probably black colors) from LCD and it is connected to notebook system board. Disconnect the LCD cable from the system board. You can replace notebook LCD Display using this steps.
Remove the screw connecting the notebook LCD cable to the motherboard base.
Disconnect the flat LED board cable from the system motherboard.
STEP 10 How to replace display Hinges.
Carefully lift the display/LCD assembly off the motherboard base.
The display/top cover assembly - LCD assembly and top cover assembly connected by hinges. Laptop display LCD hinges are dominant component for LCD working. This steps of how to take apart notebook direct you in proceeding of how to replace laptop LCD hinges. This step conclude how to replace notebook LCD display.
STEP 11 How to replace notebook hard-disk holder.
Remove the screws securing the notebook Hard Disk holder. Normally there are 4 screws for notebook Hard disk holder.
Remove the Hard disk holder. You have successfully replace hard disk holder. Notebook hard disk holder made up of plastic case.
Disconnect the left and right speaker cables from the system board.
STEP 12 How to Replace Notebook CPU Heatsink Assembly.
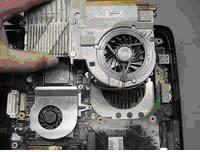
Remove five screws securing the heatsink assembly for CPU. And disconnect the fan cable from the main board. There is a fan on CPU for cooling purpose. When CPU fan giving noise or laptop CPU OVERHEAT. You can replace CPU fan and replace CPU Heatsink for notebook repair purpose. You can take apart notebook CPU and replace CPU fan.
STEP 13 How to replace CPU fan.
Carefully take out the heat sink off the CPU. Be sure to put heat sink thermal jel /glue when reconnecting the heat sink. It can affix CPU fan on processor. It negate CPU overheating problem. This is definite steps for laptop troubleshooting. You can use it for how to fix laptop OVERHEATING problem. You have take apart many notebook hardware. This step effectuate how to replace CPU Heatsink assembly.
STEP 14
How to replace notebook System Board / Motherboard.
You need to open notebook and remove many hardware component to open and replace notebook motherboard or system board.
Remove two screws normally at the corner side, connecting the system board to the base.
STEP 15
Now lift of the system board starting from the left side, be careful with the PC card connector.
STEP 16
Remove the system board off the base. You can take apart notebook of HP Hewlett Packard, DELL, Lenovo, Acer, Google Pixelbook go, Apple, Asus, Samsung, LG, Microsoft and Huawei. This Accomplish how to replace LCD hinges, how to replace CPU heatsink and CPU fan. It include how to replace notebook system board,harddisk holder etc. You can continue to How to Open Laptop for remaining steps.


